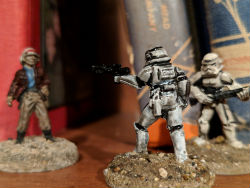
One breezy Sunday afternoon in early Fall, my children came running out of the house to find me in the garage hovered over a Stormtrooper. A very small Stormtrooper (the Star Wars variety). I was holding a brush in my right hand and in my left, on a pedestal made from a prescription drug container, was a tiny Stormtrooper, bright white paint recently applied to his iconic helmet.
Immediately they both fought to get on my lap, shouting “What are you doing? Can I see? Can I do that? Can I have one?”
And five minutes after that, both boys were sitting next to me in the garage, each painting their very own Stormtrooper. And, yes, this was an expensive toy to hand over to a child (a single soldier goes for about $4 plus shipping on ebay “buy it now”), and yes, I hesitated (stay tuned for more posts on why I have recently taken up painting my set of Star Wars miniatures circa 1992). But the looks on their faces when they were holding their newly painted bad guy was worth it.
Once completed, the children ran off to the house to bother their mother about something-or-other, but just before leaving, my youngest (4yo) asked me: “Can I paint a car next?”
Yes. Yes, you can, bud.
How to Paint a Tiny Car
You will need:
- Some tiny cars! The best part about this project is that it’s relatively cheap. At most dollar stores you can buy a pack of three die-cast (albeit junky) hot-wheels-like cars for $1. And if that’s not good enough, you can buy them in bulk online (around $25 for 100).
- Get yourself some black spray-on primer. Yes, you can get the paint-on variety as well. But if you live in the suburbs (or are close to one) you can get a can of the spray paint at any hardware or craft store for $3. And you can make quick work of a handful of cars.
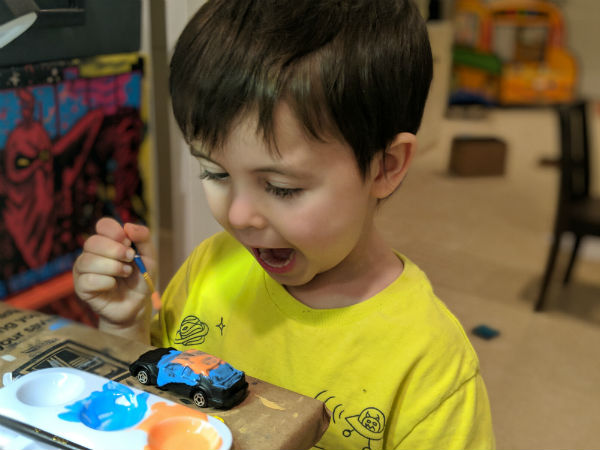
- A set of acrylic paints. I took my youngest to Michaels and just let him pick five colors from the “bargain” paints, which were around $.75 a pop. He picked four varieties of orange and one blue.
- Brushes. Again, you can generally find (at Michaels or other craft stores) an entire set of cheap brushes for under $5.
- Rubber gloves. Yeah, I know. But you don’t want to be spraying your hands with this stuff.
- A piece of cardboard, at least a foot square.
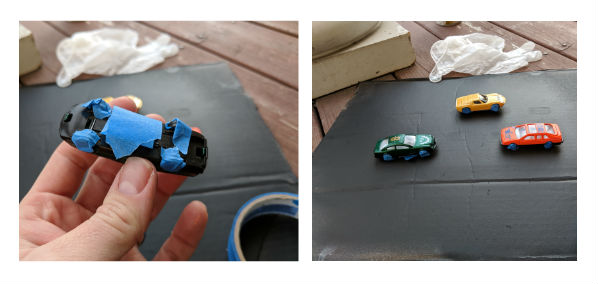
- A roll of painter’s tape. This keeps the spray paint away from those wheels. Cos if you can’t drive ’em afterwards, what’s the point?
Let’s do this:
- Tear off a few small pieces of painter’s tape and fold them around each wheel of each car, making sure you have full coverage.
- Fold a loop of painter’s tape and attach to the base of each car.
- Stick the cars onto the cardboard, spacing them out enough so that you can get the paint on evenly across each car.
- Find a spot (preferably outdoors?) where you can spray without blasting your neighbor in the face.
- Put on those gloves (at minimum on the hand holding the cardboard).
- Shake that can like you mean business for 1-2 minutes.
- Start spraying! Make sure you are around 8-12 inches away from each car. Spray in bursts until all the cars are completely covered.
- Let sit for an hour or more until dry.
- Pull off the cars from the cardboard base and set ’em up in a nice spot for the kids to paint.
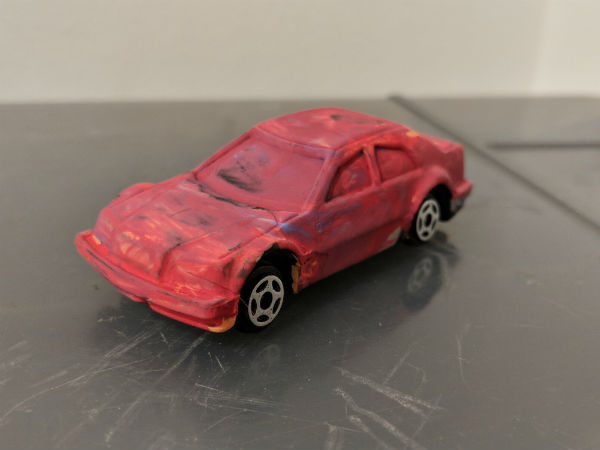
- LET YOUR KIDS GO NUTS. Apply the acrylic paints liberally. When my youngest did it, he began with blue, then orange, then more orange, and some more orange.
- Let dry overnight (or even just a few hours depending on how globby the paint job).
- Pull off the painter’s tape on the wheels. They should still move as they did before!
- DO IT AGAIN NEXT WEEK.